


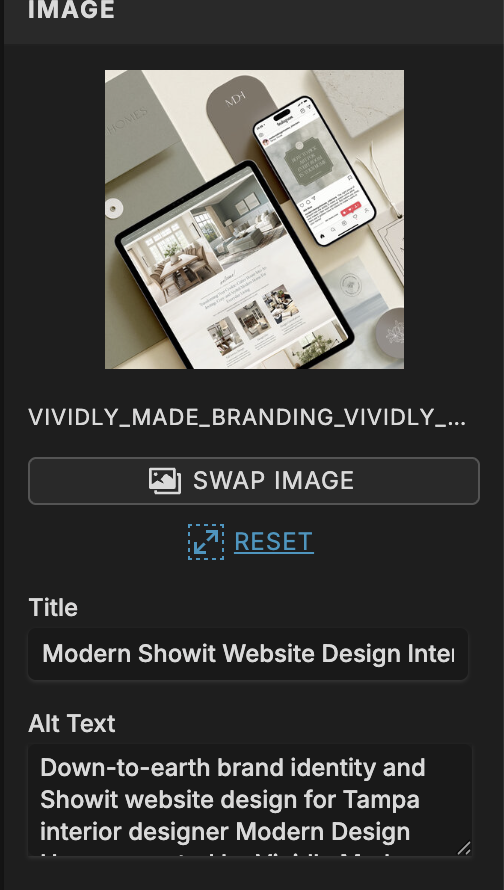
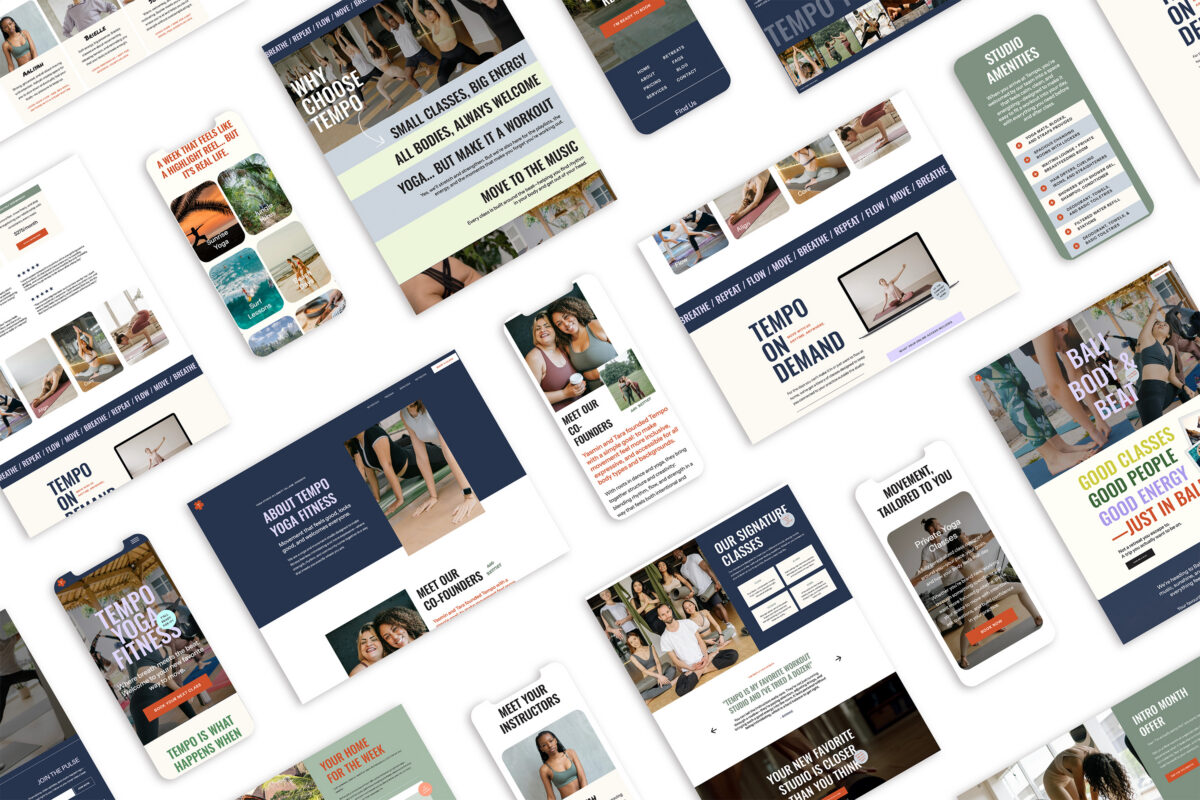
If you’re a wedding photographer, interior designer, florist, or any other creative running a visual-forward business, your website is basically your online portfolio. And let’s be honest… those stunning gallery pages you spent hours curating? They’re only doing their job if they load fast enough for people to see them.
Learning how to optimize images for your Showit website isn’t the most glamorous part of running your business, but it’s one of those behind-the-scenes moves that makes everything else work better. Think of it like prepping ingredients before you cook! A little effort upfront with a mise en place saves you from running around with your head cut off in the kitchen later.
So let’s talk about how to get your images web-ready without sacrificing quality, shall we?
Why Image Optimization Matters for Websites
Beautiful, high-resolution images are amazing… but when you upload a massive 5MB file straight from your gallery to your Showit site, you’re basically asking your website to do heavy lifting it wasn’t built for.
Site speed is one of the biggest factors that affects user experience. If your homepage takes more than a few seconds to load, potential visitors are already moving on (I know, us humans are VERY impatient!!) They’re not sitting there waiting for your hero image to slowly reveal itself like a dial-up photo from 2003.
And it’s not just about keeping people on your site (though that’s huge). Load time for a page also plays a major role in SEO. Google prioritizes fast websites in search rankings, which means if your images are slowing you down, you’re making it harder for dream clients to find you in the first place. All that to say, it is not ideal when you’re trying to get in front of ideal clients or grow your business!
How To Best Prepare Your Images For Showit
Alright, let’s get into the nitty gritty and step by step of what I do to best prepare images for Showit. These are the non-negotiables I follow every single time I’m prepping images for a website, whether it’s my own site or a client’s!
Use JPEG Format
Unless you specifically need a transparent background (hello, PNG for logos), your images should be saved as JPEGs. This format compresses really well without tanking the visual quality, which is exactly what you need for web use! If you’re pulling images from a brand photoshoot or a styled shoot collaboration, double-check the file type. It’s a small detail, but it makes a difference.
Get the Size and Dimensions Right
This is where most people get tripped up, so let’s break it down.
You want your images to be between 350-500KB in file size. Anything larger and you’re asking for slow load times. Anything smaller and you risk the image looking pixelated or washed out.
For dimensions, aim for 3500px on the long edge (whether that’s width or height depends on if it’s a landscape or portrait image). This gives you enough resolution to look crisp on all screen sizes (especially when you’re using these photos as hero banners)!
That goes without saying… the key here is balance. You want your images to be smaller in file size, but not so compressed that they lose their richness. If you’re a wedding photographer showcasing emotional moments or an interior designer highlighting texture and detail, quality still matters!! You’re just optimizing it for the web, not print.
Rename Your Images Before You Upload
Please, for the love of good SEO, do not upload files named IMG_3847.jpg or DSC_0293.jpg… I know it’s tempting and saves hours of your time prepping. However, search engines can’t read images, but they can read file names. This is free SEO real estate, and you’re leaving it on the table if you skip this step!!!
Instead, rename your images with a short, descriptive phrase that tells search engines (and humans) what they’re looking at. For example: vancouver-cliffside-wedding-venue-whistler.jpg or modern-kitchen-interior-design-white-marble.jpg.
Keep it natural and try not to overstuff one image with too many keywords… search engines are smarter than ever now! Just describe what’s in the image in a way that feels natural. It takes an extra 30 seconds, and it’s worth it, I promise. Here are some examples to get you thinking:
Naming Examples:
Family Photographer:
- family-beach-session-golden-hour-vancouver.jpg
- cozy-newborn-at-home-session.jpg
Wedding Calligrapher:
- wedding-vow-books-calligraphy-gold-ink.jpg
- coastal-
wedding-ceremony-marthas-vineyard.jpg
Interior Designer:
- carrara-marble-coffee-table.jpg
- all-white-kitchen-cabinet-millwork.jpg
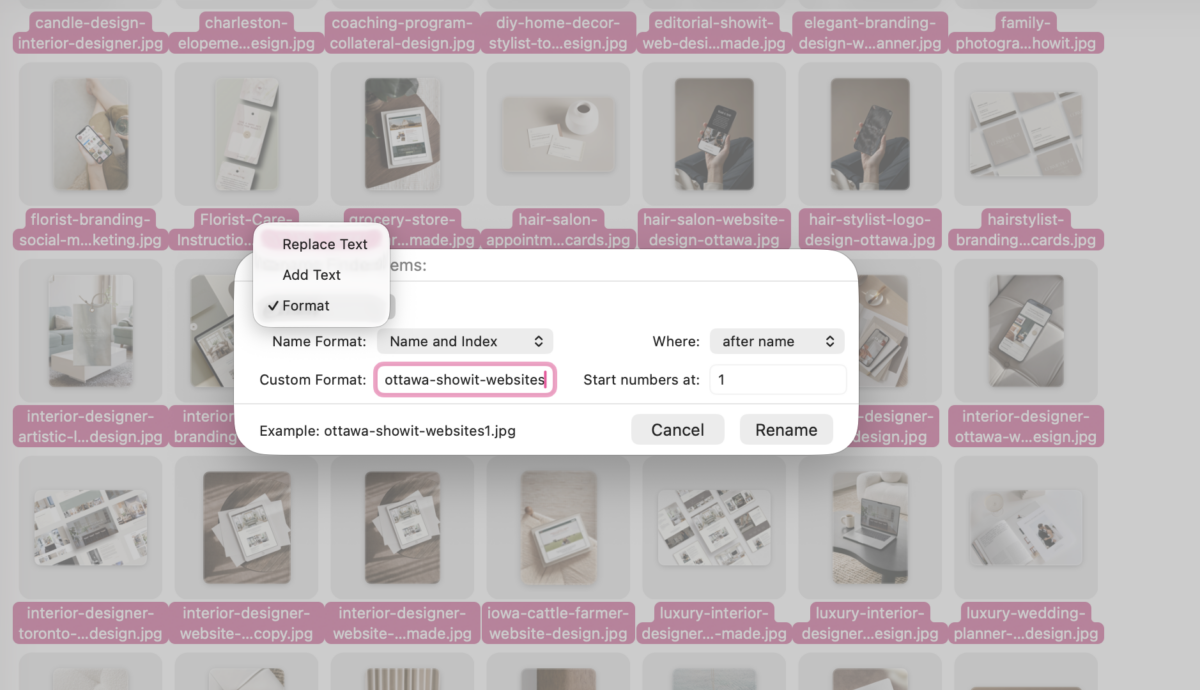
How to Bulk Rename on Mac Computers:
- Highlight all the images you want to rename
- Right-click (or Control + click) and select Rename
- Choose Format > Name and Index from the dropdown
- Enter a base name (ie. wedding-ceremony-ballroom-fairmont-chateau-laurier)
- Hit Rename and your files will now be named sequentially (image-1, image-2, etc.)
- Tweak manually if you need more specific descriptions for certain images
How to Bulk Rename on Windows Computers:
- Highlight all the images you want to rename
- Right-click on the first file and select Rename
- Type your base name (ie. wedding-ceremony-ballroom-fairmont-chateau-laurier)
- Press Enter… and Windows will automatically add numbers to the rest (image (1), image (2), etc.)
- Manually adjust individual file names if needed for more specificity
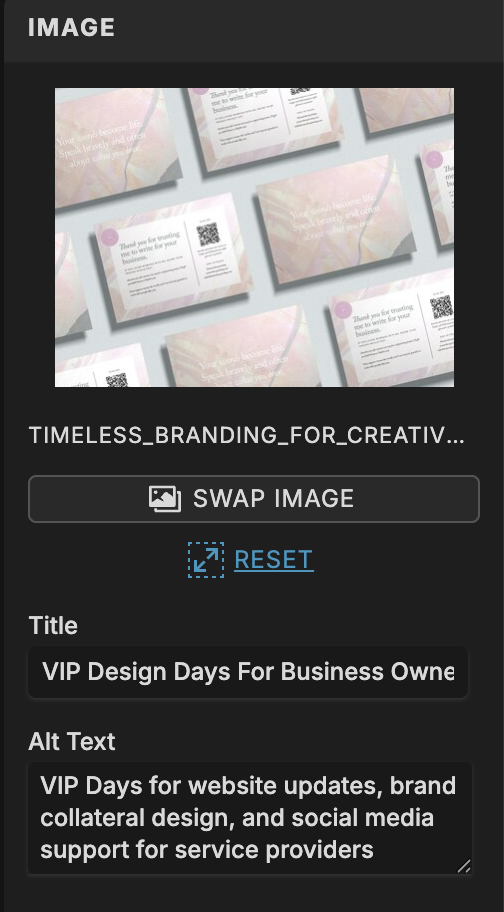
Add Alt Tags Once You Upload
Once your images are live on your Showit site, don’t forget to add alt text (also called alt tags). This is another SEO win, and it also makes your site more accessible for people using screen readers.
Your alt text should describe the image clearly and concisely. If it’s a photo of a bride getting ready in a sunlit room, your alt text might be something like: “Bride in lace robe standing by window during getting ready photos.” Keep it simple, descriptive, and helpful! Remember, this is for accessibility purposes.
Good vs. Bad Alt Text Examples:
Family Photographer:
❌ Bad: family photo
✅ Good: Family of four laughing on beach during sunset session in White Rock
Wedding Calligrapher:
❌ Bad: calligraphy
✅ Good: Hand-lettered wedding vow books with gold calligraphy and silk ribbon
Interior Designer:
❌ Bad: living room
✅ Good: Modern living room with beige linen sofa and white oak coffee table
Pro Tip: Let Your Photographer Know!!
If you’re booking a brand photoshoot or collaborating on a styled shoot with other vendors, here’s a no brainer… ask your photographer to send you web-sized images that are already optimized!
Let them know upfront that you need images at 3500px on the long edge and around 350-500KB. Most photographers are used to delivering full-resolution files, but if you give them the dimensions you need, many are happy to export a second set that’s ready for web use. It saves you time, and it ensures you’re starting with images that are already closer to where they need to be.
Same goes for collaborations too! If you’re working with a photographer, planner, or venue on a styled shoot, communicate your image specs early. Everyone wins when the final gallery is already optimized for everyone’s websites.
Related Post: Why Work With A Website Designer When Planning A Brand Photoshoot

Photo Optimization Tools I Recommend
Okay, so you’ve got your images renamed and you know the size you’re aiming for. Now what?
If you have access to Photoshop or Lightroom, you can easily resize and compress images directly in those programs. However, I know not everyone has a subscription to Adobe Creative Cloud! So here are the free (or low-cost) tools I recommend for anyone who wants to optimize images for their Showit website without a steep learning curve:
- CompressJPEG and TinyPNG are both super straightforward. You upload your image, it compresses it, and you download the optimized version. Done. These are great for quick one-offs when you just need to shrink a file or two.
- Compressor.io gives you a bit more control over compression levels, which is nice if you want to see the before-and-after and make adjustments.
If you’re dealing with a lot of images at once (like, say, an entire wedding gallery or a full brand photoshoot), check out RedKetchup.io. They have tools for bulk resizing and compressing, which can save you a ton of time. You can upload multiple images, set your parameters, and let it do its thing. It’s kind of a lifesaver for bigger projects instead of resizing images one by one!
Bonus: If you’re also working with video content (ie. social media reels or behind-the-scenes clips), you’ll want to optimize those too. HandBrake is a free video compressor that works beautifully, and Adobe Express also has video compression tools if you’re looking for something web-based!
- Format: MP4
- Size: UNDER 8MB
Audit Your Showit Site Speed After Image Optimization
Once you’ve optimized and uploaded your images, don’t just assume everything’s running smoothly — actually check your work.
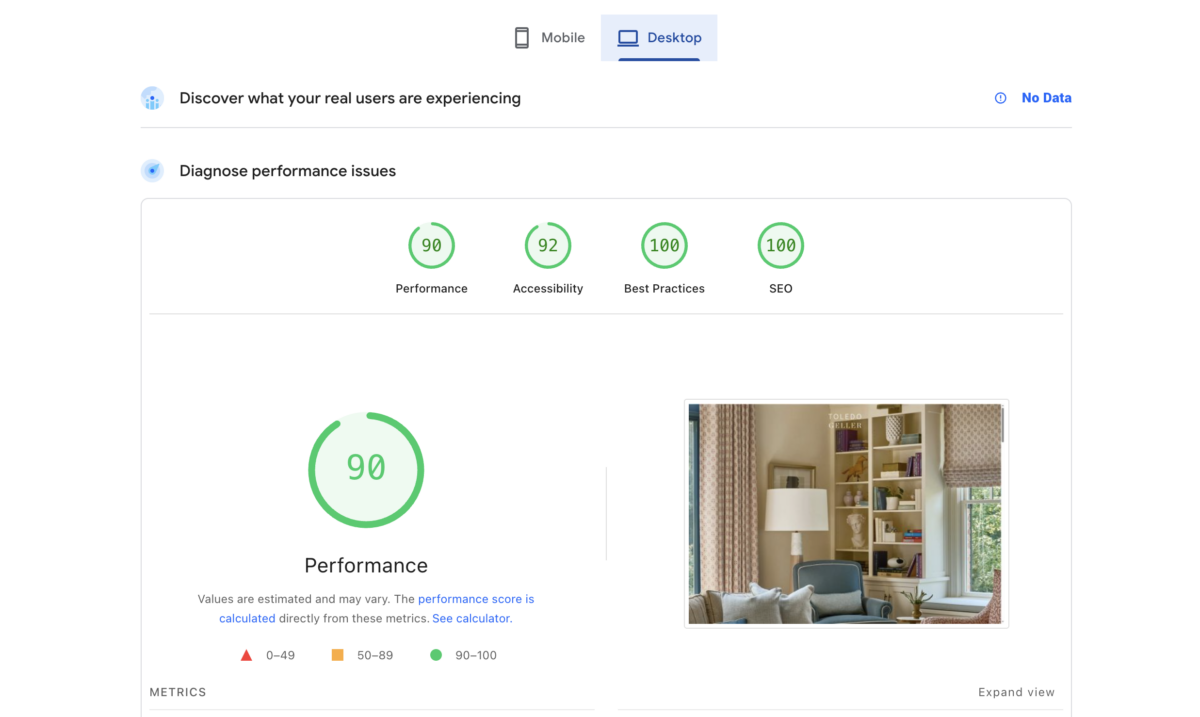
Head over to Google PageSpeed Insights and plug in your website address. This free tool will analyze your site’s performance on both mobile and desktop, and give you a score along with specific recommendations for improvement.
If you’ve done your image optimization correctly, you should see faster load times and a better overall score. If PageSpeed Insights is still flagging image issues, it’ll tell you exactly which images need more compression or resizing so that you can go back and adjust.
Think of it as a final quality check. You wouldn’t send a client proposal without proofreading it first, right? Same concept here!
Quick Reference Cheatsheet
| What to Do | How to Do It |
| File Format | Save as JPEG (unless you need transparency, then use PNG) |
| File Size | 350-500KB is preferred! (try not to go over 900KB!) |
| Dimensions | 3500px on the long edge (especially for horizontal, banner images) |
| Renaming | Use descriptive file names (i.e. cozy-newborn-at-home-session) |
| Alt Text | Write clear, descriptive alt text for every image after uploading |
| Free Tools | CompressJPEG, TinyPNG, Compressor.io, RedKetchup.io |
| Check Your Work | Run your site through Google PageSpeed Insights |
Main Takeaway
Here’s the bottom line: Preparing images for website design optimization is just as important as having quality images in the first place.
You can have the most cinematic, emotive photography and a beautiful website … but if your site takes forever to load, none of it matters. Your ideal clients won’t stick around long enough to see it, and search engines won’t prioritize you in results.
The good news is that optimizing images for your Showit website doesn’t have to be complicated or time-consuming. With the right file format, size, naming conventions, and a couple of free tools in your back pocket, you can make sure your site looks stunning and performs the way it needs to for SEO.
And honestly? Once you get into the rhythm of it, it becomes second nature. Resize, rename, upload, add alt text. Rinse and repeat. Your future self (and your website visitors) will thank you.
Of course, that goes without saying, time is money! If you prefer to outsource it to a professional who does this every day, I’m the girl for you and would love to help get your website as optimized as possible! Reach out directly here to chat or book a Design Day with me!


FREE One-Page Showit Website Template
Take Showit For A Spin
Bringing your designer into your photoshoot ensures every image is intentionally aligned with your website, messaging, and designed to convert, not just look beautiful!

Why Work With A Website Designer When Planning A Brand Photoshoot
Finally, a design-forward AND user-friendly email marketing tool that makes sending emails fun again while bringing in actual conversions and results!

Why Flodesk Is The Best Email Marketing Platform For Small Business Owners
Read the post →
Readers' Favorites
read the post →


 connect with me on the gram!


© Vividly Made 2020-2026
")


